


- Most of you know, but mastering involves ONE single stereo interleaved file (.wav, .aiff, .mp3) per song. 48hz or 44.1hz and 16 or 24bit. If you’re sending more than one file, this is mixing. Check out my mixing rates.
2. Do not go over 0 level on any of your tracks or the main/stereo out. -3 to -6 dbs from the top is fine. Overall volume boost is done in mastering, not mixing.
Your stereo mix should look something like this.
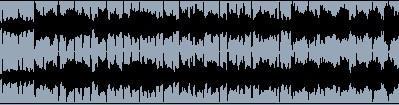
NOT like this, over level and DISTORTED.
Surprisingly, many clients don’t know what mixing is. I will address that first.
Mixing is individual tracks (vocals, bass, guitar, etc.) mixed together to make a complete song (single stereo interleaved file). You upload the individual tracks/stems and I mix and master them into a single song file.
Stems are a single or combination of tracks. Example – One vocal track exported as one file is one stem. If you mixed a few back vocals together and exported them as one stereo file, that’s also one stem. Many Hip Hop artists send one stereo music file, and one vocal file. That’s two stems.
I charge only $4 per stem. It’s up to you to decide which tracks to combine for your stems, if any. You could send each instrument, and vocal track as single individual files. Most do it this way.
Here are a few tips on how to prepare your tracks/stems for mixing:
1. We do not work with pro tools, fl studio, cubase, etc. session files, only .wav, .aiff files, or MP3 files.
2. Export each files at 44.1 or 48kHz, and 16 or 24bit. IMPORTANT – Each stem file must be exported from beginning to end, so when I import each one and start at 0:00 the entire song plays in sync. Please, DO NOT upload a bunch of random .wav file clips from your DAW audio folder.
3. Do not go over 0 level and clip any of your tracks.
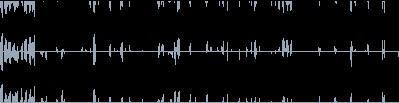
Your stems should look something like this.
NOT like this, over level and DISTORTED.
4. When recording vocals, use minimal compression and bass roll off (Hi pass no more than 100hz). Or no bass roll off at all. We will take care of it. I don’t want the vocals thin and tinny. We will roll off the bass as needed.
5. Vocal control is probably more important than compression. If the vocalist mumbles through the verses and then screams +10db louder in the choruses, with their mouth 1/2 inch from the mic, no compressor can fix that.
6. If your vocal tracks are all over the map from a volume level standpoint, they need to be smoothed out. Do a visual of the vocal tracks, highlight the offending areas, and then gain (or cut) as necessary. If you don’t know how to do this, I will do it for you in the mixing process.
7. Should you export your tracks with effects? If you have a favorite guitar distortion effect, a unique flange or chorus you really like that you KNOW you must have in the song, export the track with the effect on it. This is very common. These effects don’t take up that much space in the mix either. Adding vocal effects like autotune is also common.
Now, if it’s a huge reverb or delay, leave that to us. Once you put these space eating effects in, we’re stuck with them and it limits what we can do.
8. EQing and hi-low pass filtering tracks are fine, but not to extremes. You can leave all EQ to us too. If you were to high pass filter your vocals @500hz, they’ll all be too thin,bright and useless. Also, you eliminated the bass, so it can’t be boosted if needed.
9. Stereo tracks, like synths, should be uploaded as stereo interleaved files, not L & R mono files. We can split them if needed. Note: If we do split a stereo stem, it still counts as one stem when it comes to pricing.
10. Listen closely to every track for noise. If there’s a hiss, something could be boosted too high.
11. If any tracks are too noisy and you can’t eliminate it, noise gate the track. Make sure to add a little extra release time so you don’t cut off the audio tails.
12. You do not need to fade out each track. We will fade the entire song at the end.
13. Limit your instrumentation with space in mind. If your song has five guitars and three synths, all playing different melodies at the same time, it’s not going to work. It may be correct melodically, but it will sound like a train-wreck when all playing together, leaving no room for the vocals either. This is why no one ever does this!
14. Most important once again, make sure when your tracks are exported and start at 0:00, they’re all in sync. If even one track is early or late, its a time consuming process moving it up and back.